1. Case Overview
Often, we don’t want to “scrape all products.” Instead, we want to: Narrow down the scope first, and then only keep the small subset of results that “truly meet the criteria.” A typical operation usually involves three layers of filtering:- Search Box Filtering: First, input keywords (e.g., “laptop”) in the search box to narrow down from the entire site to a specific category.
- Category Filtering (Sidebar/Conditions): Check filter conditions on the left or top of the page, such as “Hard Drive Size 1TB” or “CPU Brand Intel”.
- Content-Level Filtering (AI Filtering): Even if the website has already filtered the results, we may still only want items that satisfy a specific text condition. For example: Only keep laptops that mention “Energy efficiency.”
- Search for “Laptop” in the search box.
- Check “Hard Drive Size” and “CPU Brand” in the left sidebar filters (controlled by parameters).
- Traverse the search result list and only collect laptop information that contains energy-efficiency-related content.
- Export the filtered results as a CSV table.
- A Search Box
- A Category/Filter Panel
- A List + Item Descriptions

2. Detailed Steps (Step-by-Step Guide)
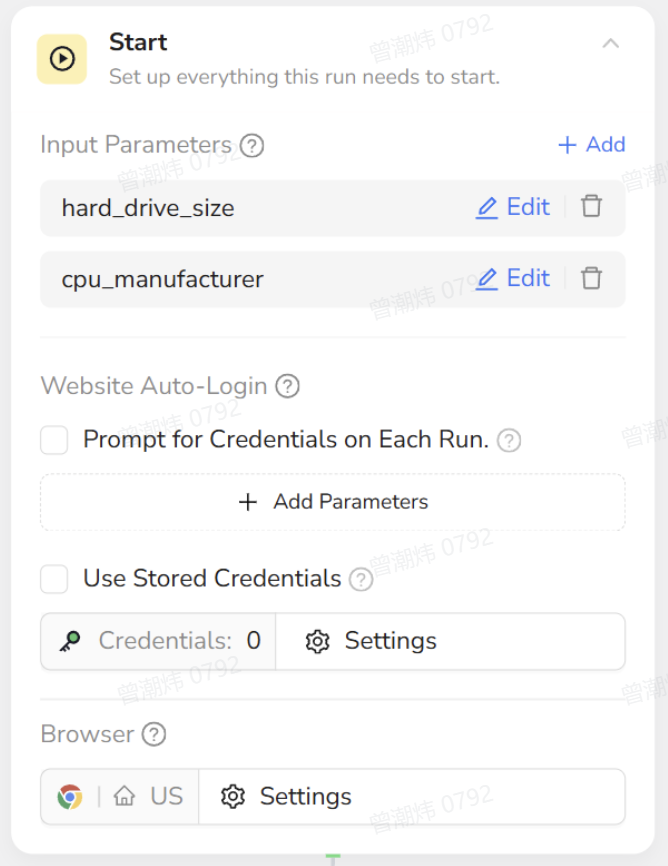
1. Start (Optional: Parameterize Filter Conditions)
- Recommendation: This step is optional but highly recommended to make the workflow flexible and reusable.
- Objective: Define “filter condition parameters” in the Start node so subsequent nodes can reference them using
/parameter_name. - Example Parameters:
hard_drive_size: e.g., “1 TB”cpu_manufacturer: e.g., “Intel”
- Benefit: When reusing the workflow, users only need to change the parameters instead of editing individual nodes.
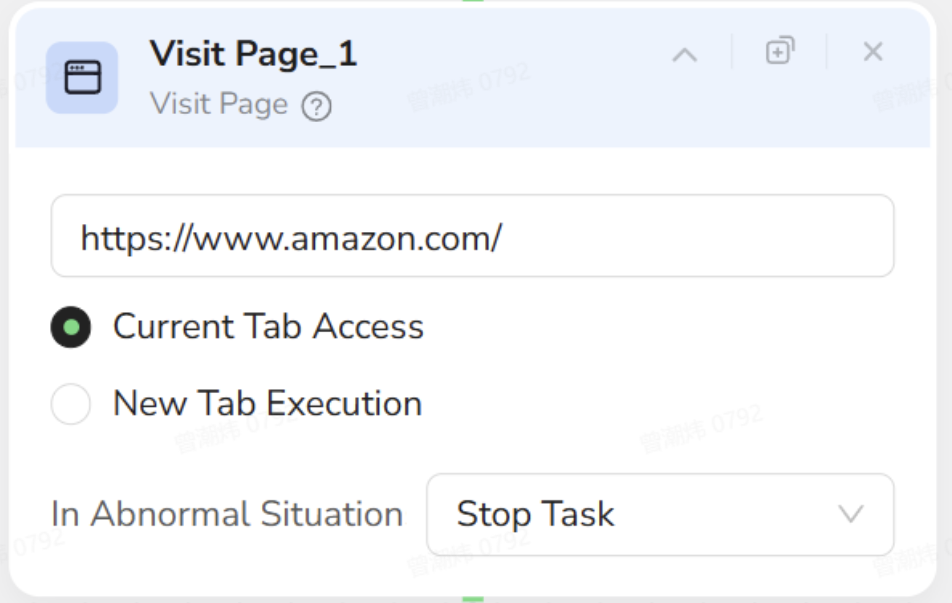
2. Visit Page (Open Amazon Homepage)
- Objective: Open the Amazon homepage and prepare to search.
- Configuration:
- URL:
https://www.amazon.com/ - Tab: Select Current Tab Access.
- In Abnormal Situation: Keep Stop Task.
- URL:
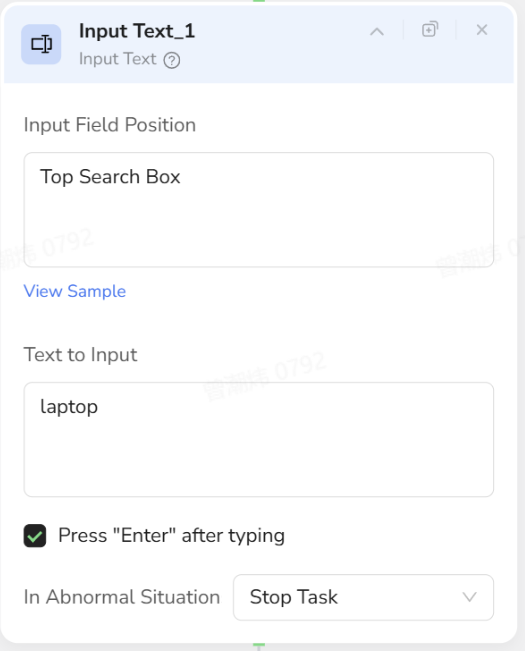
3. Input Text (Search Box Filter: Keyword = Laptop)
- Layer 1 Filtering: Use the site’s built-in search box to lock the scope to “Laptops.”
- Objective: Find the top search box, type “Laptop,” and press Enter.
- Configuration:
- Input Field Position: Select the Top Search Box.
- Text to Input: Enter
Laptop(or reference a parameter like/keyword). - Setting: Check Press “Enter” after typing. This triggers the search automatically.
- In Abnormal Situation: Keep Stop Task.
Result: The page changes from the “Site Homepage” to the “Laptop Search Result List.”
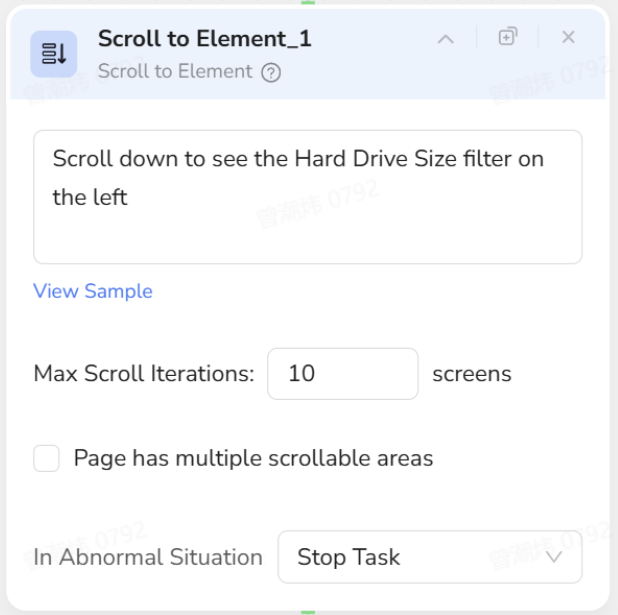
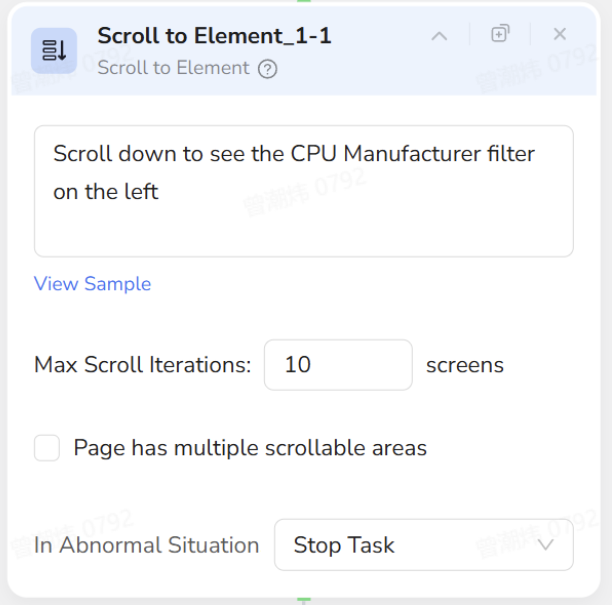
4. Scroll to Element (Scroll to Filter Area: HDD Size)
- Layer 2 Filtering - Step 1: Bring the left filter panel into view.
- Objective: Scroll down the page until the “Hard Drive Size” section appears on the left.
- Configuration:
- Description:
Scroll down to see the Hard Drive Size filter on the left. - Max Scroll Iterations: e.g.,
10 screens. - In Abnormal Situation: Keep Stop Task.
- Description:
5. Click Element (Select HDD Size Filter)
- Objective: Under the “Hard Drive Size” category, click the desired capacity option (e.g., 1 TB).
- Configuration:
- Description:
Click on the /hard_drive_size option under Hard Drive Size category on the left. - Action: Select the corresponding checkbox on the page. (If using the
/hard_drive_sizeparameter, the AI will match the option based on the text). - In Abnormal Situation: Keep Stop Task.
- Description:
Result: The product list is now filtered by the website to show “Laptops + Specified HDD Size.”

6. Scroll to Element (Scroll to CPU Brand Filter Area)
- Objective: Scroll down further until the CPU manufacturer filter section appears.
- Configuration:
- Description:
Scroll down to see the CPU manufacturer filter on the left. - Max Scroll Iterations:
10 screens. - In Abnormal Situation: Keep Stop Task.
- Description:
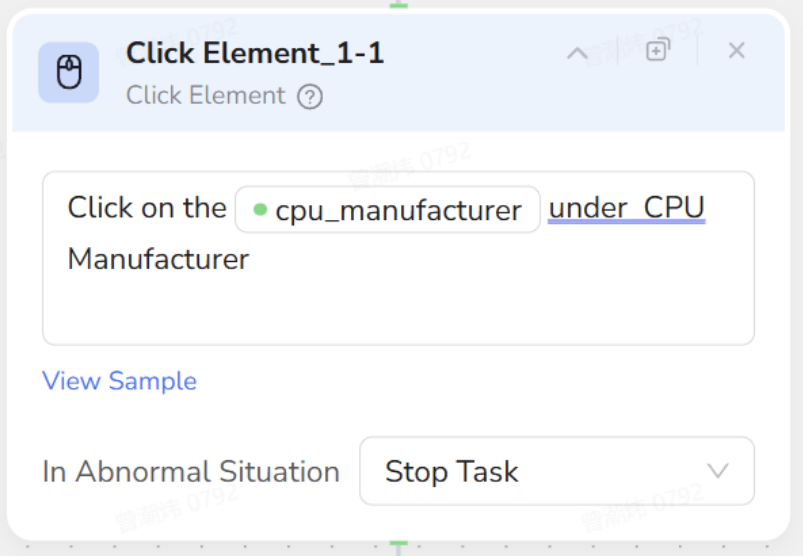
7. Click Element (Select CPU Brand Filter)
- Objective: Under the CPU Manufacturer category, click the specified brand (e.g., Intel, or from a parameter).
- Configuration:
- Description:
Click on the /cpu_manufacturer option under CPU Manufacturer category. - Action: Select the corresponding brand checkbox on the page.
- In Abnormal Situation: Keep Stop Task.
- Description:
Milestone: The first two layers of filtering are complete using native website features: Search Keywords + Left Sidebar Filters.
8. Loop List (Traverse Filtered Product List)
- Layer 3 Start: In the filtered result list, perform “Content-Level Filtering.”
- Objective: Treat the middle product search results as a list and traverse each item sequentially.
- Configuration:
- List Region: Select the product card area in the middle. Description:
Search results list in the middle. - Auto-click “Load More”: Check if applicable based on page structure (pagination vs. load more).
- Max items to focus: e.g.,
10(adjust as needed). - In Abnormal Situation: Keep Stop Task.
- List Region: Select the product card area in the middle. Description:

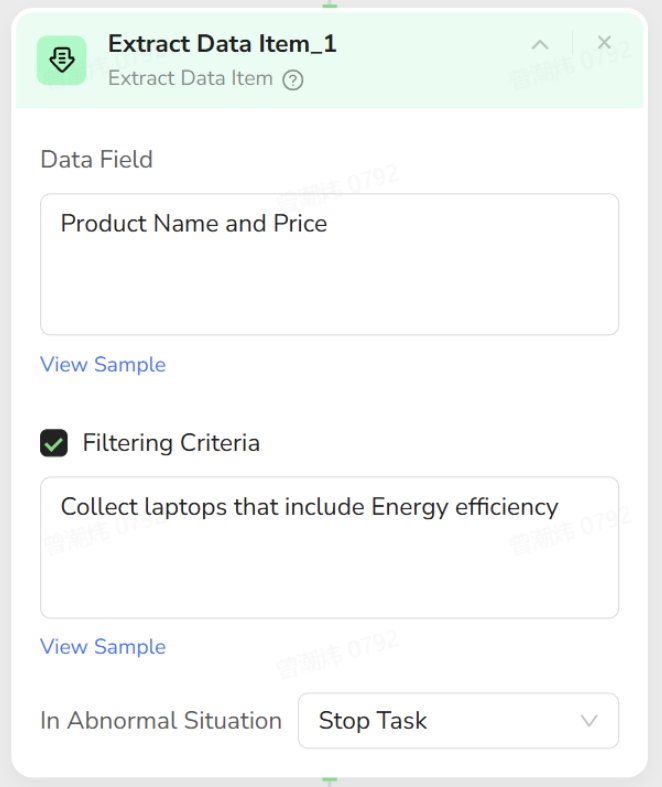
9. Extract Data Item + Filtering Criteria (Content Filtering: Energy Efficiency Only)
- Layer 3 Filtering: Do not rely on the website anymore; perform content filtering during the Scraping Phase.
- Objective: For the currently focused product card:
- Read fields like Product Name and Price.
- Only write to the results if the “Product info involves energy efficiency.”
- Configuration:
- Node Type: Extract Data Item (Child of Loop List).
- Data Fields:
- Product Name
- Price
- Filtering Criteria: Check this box.
- Description:
Collect laptops that include Energy efficiency. (Only collect laptops where the description mentions energy efficiency). - In Abnormal Situation: Keep Stop Task.
Effect: For every item, the AI reads the text. If it matches “Includes Energy efficiency,” the Name and Price are saved. If not, it skips the item entirely.
10. Finish: Output Data (Export Filtered Results)
- Objective: Once traversal is complete, export all products that passed the “Three-Layer Filter.”
- Configuration:
- Output Format: Select CSV (convenient for spreadsheet viewing).
- Output as a file: Select based on need.
- In Abnormal Situation: Keep Stop Task.
Final Output: A precise list that has passed Search Box + Category Filter + AI Text Content Filter.

3. Human Operation vs. AI Nodes
To better understand the workflow, compare how a human operates versus how the AI nodes are structured.| Your Action (Human Operation) | Corresponding AI Node | Function Description |
|---|---|---|
| Think: “I want a 1TB HDD, Intel CPU laptop, specifically mentioning energy efficiency.” | Start (Input Parameters) | Abstract conditions into parameters (hard_drive_size, cpu_manufacturer) for easy reuse. |
| Open Amazon homepage. | Visit Page | Starts the entire operation. |
| Type “Laptop” in top search box and press Enter. | Input Text | Layer 1 Filter: Narrow scope from “All Site” to “Laptops.” |
| Scroll down to find the HDD filter on the left. | **Scroll to Element **(HDD Size) | Brings the filter section into view for reliable clicking. |
| Check “1 TB” in the HDD section. | Click Element (HDD Option) | Layer 2 Filter (Part 1): Use website filter to limit storage capacity. |
| Scroll down to find the CPU brand filter. | **Scroll to Element **(CPU Brand) | Brings the CPU filter section into view. |
| Check “Intel” in the CPU section. | Click Element (CPU Option) | Layer 2 Filter (Part 2): Limit CPU brand. |
| Look at the filtered results, ready to check one by one. | Loop List | Treats the middle product cards as a list and iterates through them. |
| Check each item: Read description. If it mentions “Energy efficiency,” write down Name/Price. Otherwise, skip. | Extract Data Item + Filtering Criteria | Layer 3 Filter: AI-based content filtering during scraping. Only saves matching items. |
| Compile the final list of matching laptops into a CSV. | Finish: Output Data | Exports the multi-dimensionally filtered data into a structured file. |
Summary
Case 5 demonstrates a classic “Three-Layer Filtering + Scraping” workflow:- Search Box: Narrow scope from full site to a category.
- Category Filter: Use native website filters to tighten conditions.
- Content Filter: Use AI during scraping for the final “Only keep results matching specific text criteria” layer.